
Do you want to know how to make your content stand out on social media?
With over 4 million new blog posts published every day, it’s essential to make sure your content catches people’s eyes in every possible place – and social media is one of the most important.
So what’s the solution? Open Graph meta tags of course!
In this guide, you will discover:
- What Open Graph is
- Why you need Open Graph
- The different types of Open Graph
- How to implement Open Graph on your website
- How to test your Open Graph tags
What is Open Graph?
Open Graph meta tags are small snippets of code, similar to meta titles and descriptions, that control how URLs look when they are shared across social media.
Originally created by Facebook, to make the use of social metadata standardized across websites, Open Graph makes it easy to represent the content of a page when it is posted onto social media.
You can find them in the <head> section of a webpage and they provide details such as the page’s title, description, featured image and more to social media platforms. This ensures your shared content always looks its best.
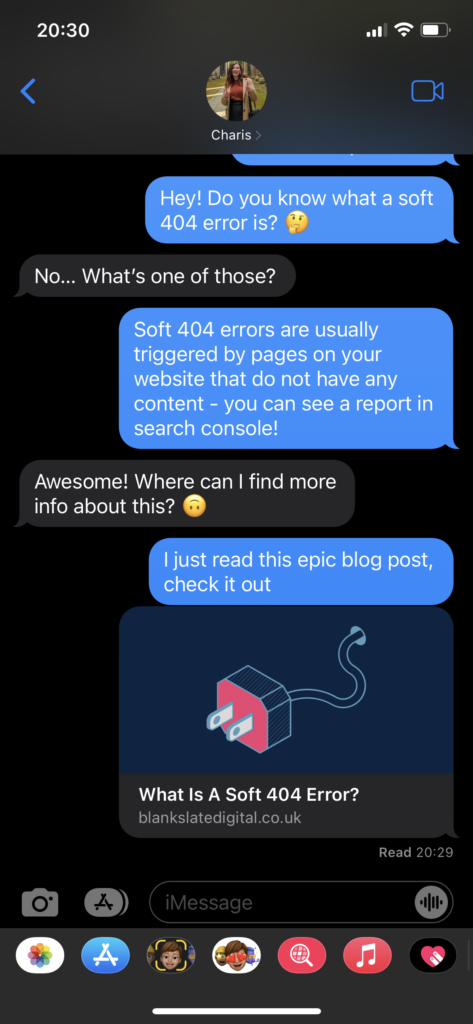
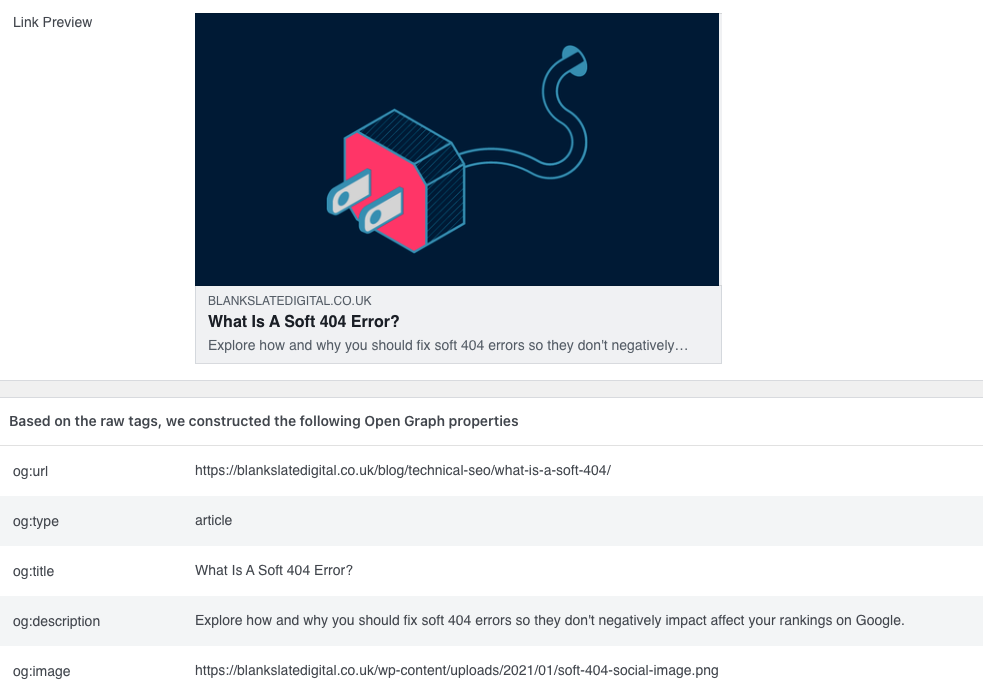
Here’s what our soft 404 blog post looks like when we shared it on LinkedIn – this page utilises Open Graph meta tags:

Here’s how that looks inside the webpage <head> :
<meta property="og:locale" content="en_GB" />
<meta property="og:type" content="article" />
<meta property="og:title" content="What Is A Soft 404 Error?" />
<meta property="og:description" content="Explore how and why you should fix soft 404 errors so they don't negatively impact affect your rankings on Google." />
<meta property="og:url" content="https://blankslatedigital.co.uk/blog/technical-seo/what-is-a-soft-404/" />
<meta property="og:site_name" content="Blank Slate" />
<meta property="article:published_time" content="2021-01-31T14:37:34+00:00" />
<meta property="article:modified_time" content="2022-02-06T20:11:05+00:00" />
<meta property="og:image" content="https://blankslatedigital.co.uk/wp-content/uploads/2021/01/soft-404-social-image.png" />
<meta property="og:image:width" content="1000" />
<meta property="og:image:height" content="500" />
<meta property="og:image:type" content="image/png" />This is what a similar post looks like without OG tags:

So, it is pretty obvious which post would receive more engagement and clicks. As you can see on the example with OG meta tags utilized, the featured image, title, read time and site URL are all displayed, leading to a far more eye-catching post to promote your shiny new content!
This example is a very similar story across all social media platforms, so by not using Open Graph nothing inherently bad happens, but it does mean you are missing out on loads of features that help your content stand out from the timeline!
Why are Open Graph tags important?
When a piece of content is shared using Open Graph tags it is far more visible in social feeds, generating more traffic from social media to your website.
The main reasons why you should be using and optimising your open graph tags are:
- Your content is better displayed, catching the attention of people scrolling down their feeds. This gives those users a snapshot of what the article is about before clicking.
- OG tags help Facebook and other social media platforms better understand what your content is about – leading to more visibility within discovery features and on-platform searches.
- When your content is shared via links within direct messages, OG meta tags help to create a snippet on platforms where the protocol is supported. This includes; Facebook Messenger, WhatsApp, iMessage, Discord, Slack and more.
The different types of Open Graph tags
There are four main Open Graph tags that are essential for social media platforms to understand what your content is about; og:title, og:image, og:type and og:url. However, besides these core tags, there are a wide variety of others you can utilize on your website.

Below, we break down these four most important tags, as well as some others we recommend you include to ensure your content looks its best when shared across social media.
og:title
The og:title tag should contain the title of your page. It is the equivalent of meta titles used for search engines. If you have already created a great meta title, then you could use the same but cut out your branding/website name for the og:title.
Code
<meta property="og:title" content="The Complete Guide To Open Graph Meta Tags 2023" />Tips
- Use this tag on all pages of your website that could possibly be shared across social networks.
- Keep the title length around 40-50 characters to prevent it from overflowing and being cut off.
- Write a title that is descriptive and enticing to attract a better click-through rate and increase the amount of traffic going to your webpage.
- Unlike meta titles for search engines, do not include branding or your website name.
og:type
The og:type tag is used to describe the type of content you are sharing. This tells social media platforms if your content is an article, generic web page or other content such as a video or music.
Code
<meta property="og:type" content="article" />Tips
- Use the article object type for informative articles such as blog posts.
- Use the website type for the rest of the pages on your website.
- If you are sharing other rich media types such as music, or a video, then use the appropriate type. You can find the full list of object types here.
og:url
The og:url tag is simply the URL of the content you are sharing.
Code
<meta property="og:url" content="https://blankslatedigital.co.uk/blog/web-dev/open-graph-meta-tags/" />Tips
- This tag should contain the canonical URL of the page in question.
og:image
The og:image tag should contain the URL of the image you want to use for the social snippet. It’s important to use an image that is on-brand and descriptive of the article as it takes up the most space on your audiences social feed, providing the best opportunity to catch their eye and get more clicks through to the page.
This OG tag has a similar effect to image schema markup which is used by search engines in rich results.
Code
<meta property="og:image" content="https://blankslatedigital.co.uk/wp-content/uploads/2022/02/open-graph-featured-image.png" />Tips
- As you should be for image SEO anyway, create custom imagery that is aligned with your branding for any shareable pages on your website. For pages that will not be actively posted on social media, you should set your brand’s logo, just in case a third party ever shares the page.
- Your OG image should have an aspect ratio of 1.91:1 with the minimum dimensions of 1200×630 to avoid any pixelated or low-quality imagery.
Using the og:image:width and og:image:height tags ensures that your image shows exactly as intended each time it is shared. If you use Yoast on WordPress, they are added automatically, but just in case, here is the code:
<meta property="og:image:width" content="1200" />
<meta property="og:image:height" content="630" />
og:site_name
The og:site_name tag should contain the name of the website in which your content is on. This essentially replaces the brand name that would be in your meta title – which is not recommended to be included in your og:name tag.
So, if you are sharing a blog post you would have the og:title tag that contains the descriptive title of that blog post, and the og:site_name tag would be the name of your website or brand.
Code
<meta property="og:site_name" content="Blank Slate Digital" />Tips
- To keep your branding consistent, use the same site name tag across every page of your website.
og:description
The og:desctipion tag should contain a short yet descriptive snippet of text that is as appealing as possible to entice clicks to your page.
This tag is equivalent to a meta description used by search engines, and you can use the same content as your meta description if it fits well.
Code
<meta property="og:description" content="Discover how and why your website needs Open Graph meta tags." />Tips
- Keep your description short, ideally between 50-100 characters. Facebook recommends that you use 2-4 sentences, but it is often cut off.
- Your description should be as optimised as possible to generate the most interest and get the best click-through rate to the content you are sharing.
og:locale
The og:locale tag defines the language of the content you are sharing. If your website offers users content in different languages, then this is the ideal opportunity for you to let social platforms know.
Code
<meta property="og:locale" content="en_GB" />Tips
- Facebook assumes that content without a og:locale tag is written in American English (en_US), so if you are an American website serving content in English to users, then you don’t actually need to include this tag.
- If your content is written in anything other than American English, make sure the relevant OG tag for your language is included.
How to set up Open Graph meta tags on your website
Now you know what Open Graph is, it’s time to get it implemented onto your website! Skip right ahead to your website platform using these links below:
Add Open Graph to WordPress
The fastest, easiest and most popular way to add OG tags to your WordPress site is to install the Yoast SEO Plugin. Chances are, if you have optimised your website for SEO, you already have this plugin installed.
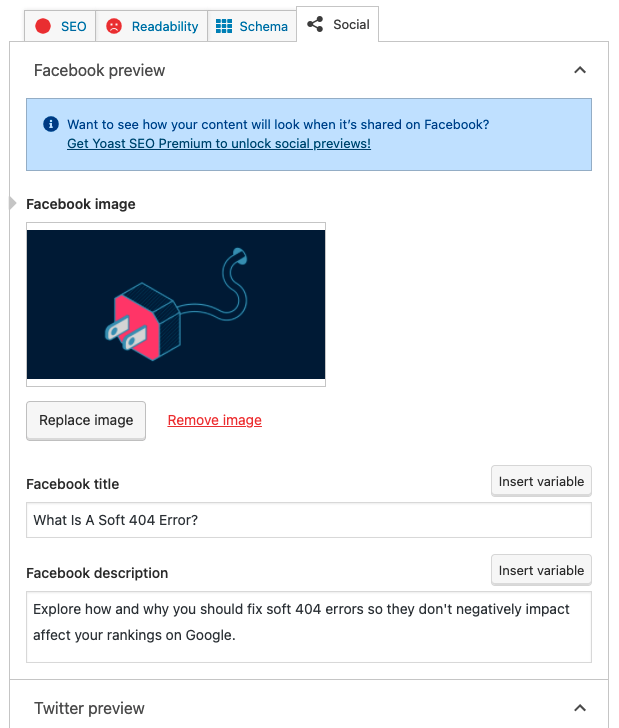
On the back end of your website, navigate to the editor for the post or page you want to add Open Graph to, scroll down to the Yoast SEO box and navigate to the ‘social’ tab.
Inside the ‘Facebook’ accordion, fill out the input fields to set the og:image, og:title and og:description tags.
You don’t need to manually set the og:url tag or other tags such as the Twiter Card or image dimensions – as Yoast does this automatically. Also, if you do not set up an OG image on the post, but it does have a featured image, then Yoast will default to this and use it as your og:image.
Don’t forget to set up a sitewide og:image tag!
In order to ensure that an image is shown in the snippet anytime your website is shared – even if it’s a URL that hasn’t got an og:image manually set – it’s best practice to set a sitewide image. This will only show on the snippet whenever there is no custom og:image tag set for a given URL.
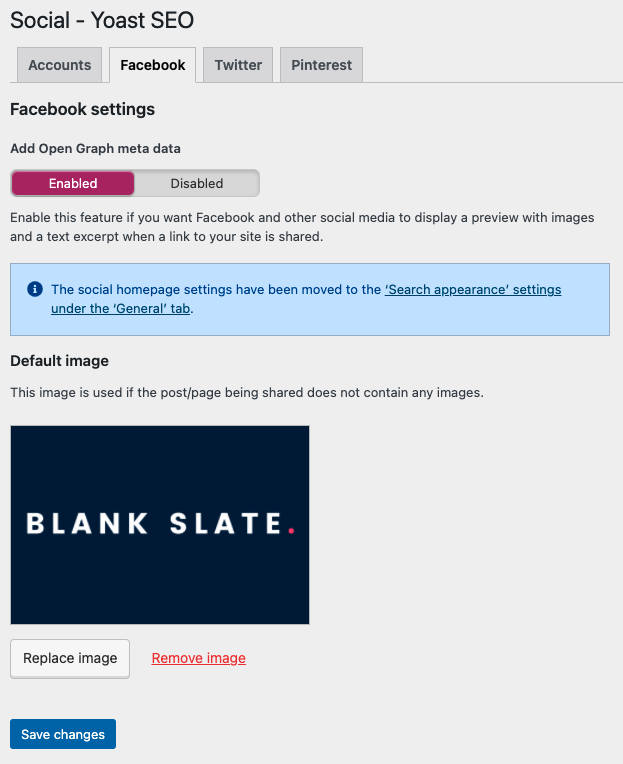
In order to set a default sitewide og:image, go to the main settings page for Yoast.
On the left-hand menu of WordPress, navigate to;
Yoast > Social > Facebook.
Set the toggle to ‘enabled’ and upload the image you want to default to. We recommend a generic branded image – such as the logo.
Add Open Graph to Webflow
On Webflow, you can set OG tags for pages and dynamic tags for other pages such as collections, however, you cannot set a default site-wide og:image. The Webflow team state;
“Open Graph content works best when it’s specific to the page being shared. For example, your home page’s Open Graph content should be different than your pricing page’s. That’s why there’s no option to set OG settings globally”
Read more
Now that’s all totally correct, but it’s a shame there is no option to set sitewide OG on Webflow. If OG wasn’t implemented at the time of pages being created, it could be a huge job to go through each page manually to set them up, especially on large websites.
So if this applies to you, just focus on getting the Open Graph meta tags set up on the key pages of your website which are most likely to be shared across social networks, then turn your attention to less-prominent pages if you have the time and patience.
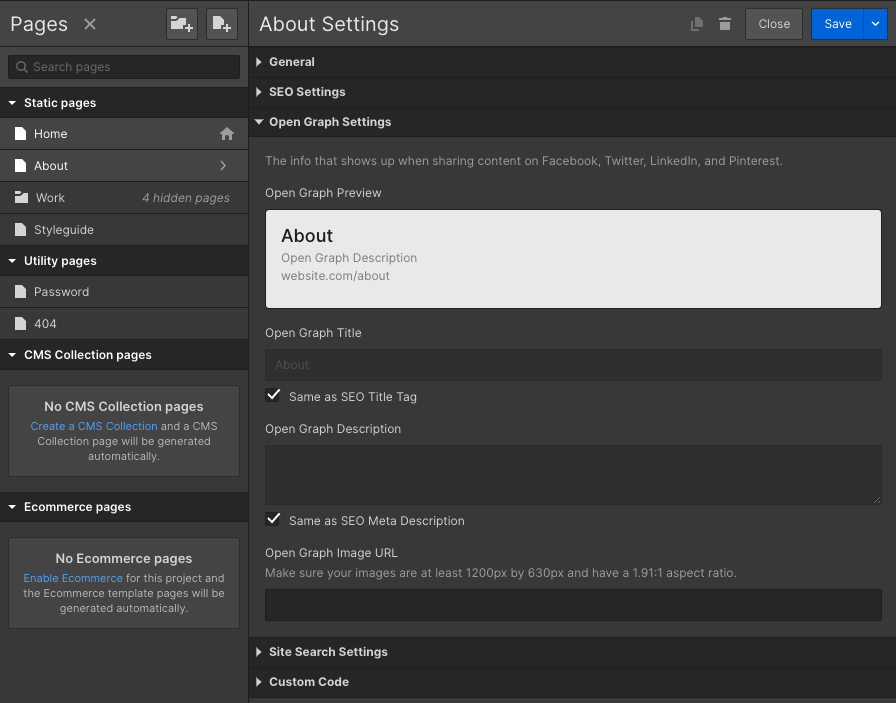
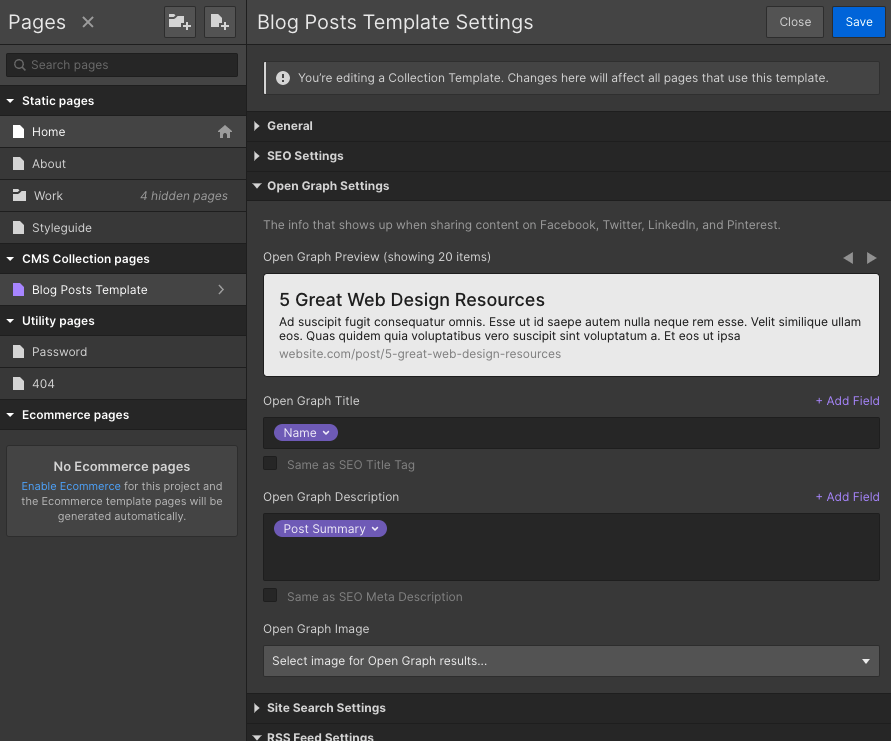
That being said, you can set up OG on your individual pages by navigating to;
Pages Panel > Page Settings > Open Graph Settings
Here, you can set the og:title, og:description and og:image tags and if you want to, you can click the tick boxes to set these to be the same as your meta title and descriptions. But as we mentioned before, it’s best practice to include your brand name in your SEO meta title, but not in your Open Graph title, so we suggest not using this tickbox.
Webflow’s dynamic Open Graph settings can be accessed from the collection template page settings, just the same as above. But the key difference here is that the collection pages have the ability to pull unique information from each item within the collection.
This means that instead of adding different Open Graph information for each item, you can set it so Webflow pulls it automatically from the item name, its summary and the thumbnail image.
Add Open Graph to Shopify
The majority of Shopify themes automatically pull Open Graph from variables such as the title tag and featured image. This makes it super easy to ensure your site has OG implemented, but it does take away the amount of customisation you have.
If you do need to check or edit the OG tags of your Shopify site, you can do this manually from social-meta-tags.liquid within the code editor.
However, through Shopify’s interface, you can customise the sitewide og:image tag that will be used as a default in case the shared page doesn’t have a featured image set.
You can set up this image in the store settings, to find this, navigate to;
Online Store > Preferences > Social Sharing Image Preview
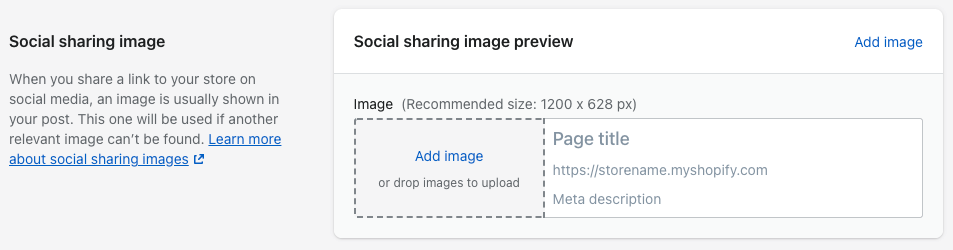
Same as before, we recommend that you use a generic branded image – such as the logo, to ensure that it is always relevant no matter what page of your Shopify site is being shared.
Add Open Graph to Squarespace
Squarespace automatically uses the page meta title and description for the respective OG tags, but you can set a custom og:image for individual pages.
To set the image you want to show on social media when the page is shared, navigate to;
Page Settings > Social Image > Upload.
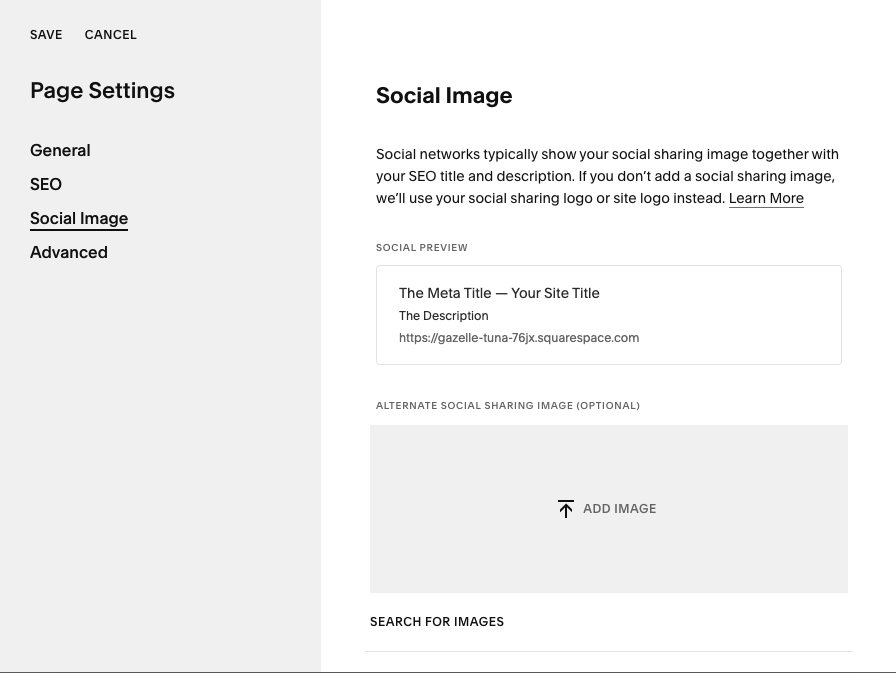
Unfortunately, this is the only Open Graph tag you can change through the user interface, but you can customise the default settings and include additional OG tags through the code editor. To do this, navigate to;
Page Settings > Advanced > Page Header Code Injection
In here, you can manually tweak the existing tags and input any more that you might need.
Don’t get put off by the manual coding! We’ve already done the hard bit for you – simply copy and paste the following code from the below manual installation section and change each tag’s content to what you want to display.
Add Open Graph to Wix
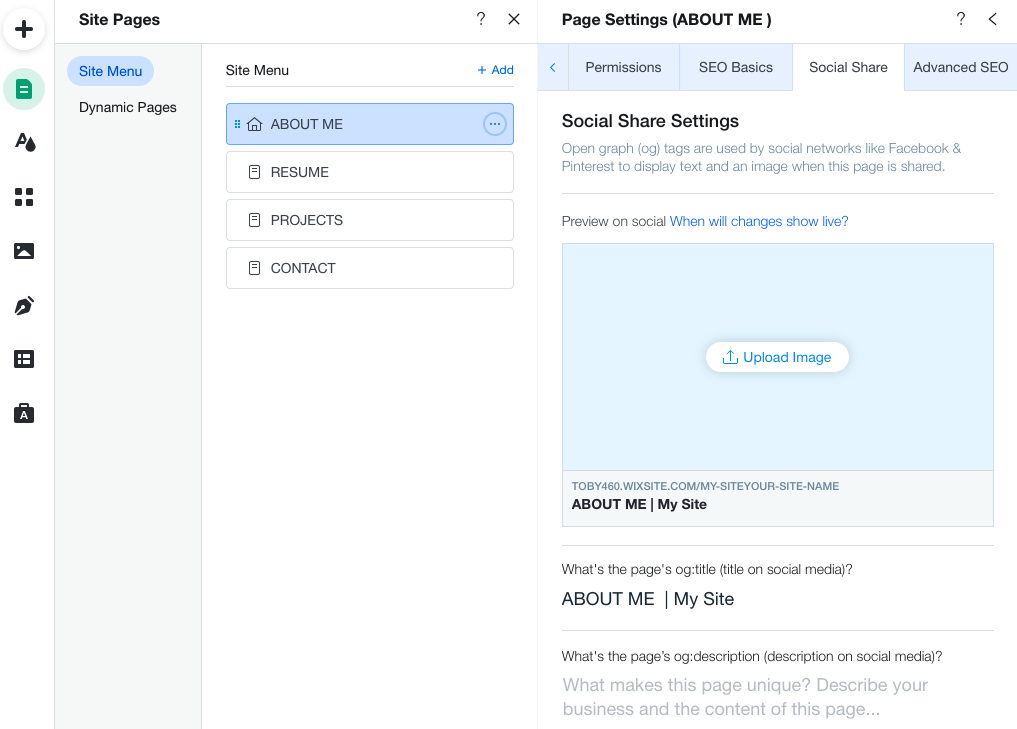
Wix makes it easy to set up Open Graph. You can add in custom titles, descriptions and images for each page, as well as add a custom sitewide og:image.
Wix does automatically pull data from other variables such as the meta title and description to use for the respective OG tags, but you can customise these for your pages by navigating to;
Menus & Pages > 3 Dots (on the page you want to edit) > Social Share
To set a custom sitewide og:image on your Wix site from the main menu, navigate to;
Settings > Social Share
This behaves in the same way as the sitewide og:image on Yoast or Shopify, acting as a default for any pages where you have not set a specific image to show. We recommend using an image that is generic, but still represents the brand – your logo is perfect for this.
Add Open Graph manually
If your website isn’t on any of the above platforms and you are confident getting stuck into code, it’s super straightforward to add OG tags.
In the section of your web page, simply copy and paste the following, but make sure you add in your specific details!
<meta property="og:site_name" content="INSERT SITE NAME" />
<meta property=“og:title” content=“INSERT TITLE" />
<meta property="og:description" content="INSERT DESCRIPTION" />
<meta property="og:url" content="INSERT URL" />
<meta property="og:type" content="INSERT TYPE" />
<meta property="og:image" content="INSERT IMAGE URL" />
<meta property="og:image:width" content="1280" />
<meta property="og:image:height" content="640" />
<meta property="twitter:card" content="summary_large_image" />
<meta property="twitter:image" content="INSERT IMAGE URL" />
Or, to make it even easier, use this tool from Mega Tags. This markup generator automatically creates the OG tags you need, reducing the risk of any mistakes in the code and eliminating syntax errors.
How to test your Open Graph meta tags
So, now you know what Open Graph is and how to add it to your website, awesome!
Well, now you have added all the tags to your website it should look great when shared across social media. But before you start sharing your content, you need to make sure they are working properly.
Testing your OG tags before sharing a URL ensures that you prevent any issues where the tags might not be pulled through or displayed correctly.
In order to do that, we recommend using the following tools;
- Twitter Card Validator
- Facebook Sharing Debugger
- Pinterest Rich Pins Validator
- LinkedIn Post Inspector
All these tools work in a very similar way, simply paste in the URL you want to check and they pull the OG tags from the page. Then you will be shown a preview of what it will look like when shared on the respective social platform.
When testing how the snippet of your URLs will look, make sure you check the image, title and description are displayed correctly. You might get some warnings pop up for unimportant tags, you can either add these to your page or just ignore them as they won’t bring any benefit.
If, when testing your URL, something doesn’t look right, update your tag and repeat. Also, ensure you test the URL on each tool so you know everything is 100%. Following this, you’re good to get sharing!
In A Nutshell…
So, to summarise. Open Graph tags are super important to ensure your website looks at its best when shared across social networks.
Optimised OG tags will make your branding fully consistent throughout the user journey and help you to build more social media presence – ultimately increasing the number of people reaching your content!
If you are finding it difficult to get Open Graph correctly set up on your website, book a free consultation with our friendly team of experts today!
